Fermented Food
Untreated fermented organic products are readily available in specialized shops as preparing them yourself involves effort and time. However, because fermentation takes time and it is so important to let healthy bacteria and their diversity grow slowly. One could also rightly say here: Strength lies in time and rest!
Nowadays, everything has to be instant, but natural fermentation needs enough time for maturation and bacterial development. What often cannot be controlled is the quality and the processing of the products with various additives, preservatives and preservatives. Therefore, our recommendation is: Make it yourself, so that you know what is inside, in order to use the microbes for yourself, for your microbiome and to maintain health.
| 2 liter |
Wasser |
| 60 g |
water kefir grains (available in health food shops or online via www.fairment.de) |
| 120 g |
organic cane sugar |
| 50 g |
unsulphured organic dried fruit of your choice (e.g. figs, sultanas, dates or apricots) |
| 2-3 |
slices of an untreated lemon or orange |
Dissolve the cane sugar thoroughly with warm water in a fermenting glass. Add the water kefir grains, dried fruit and lemon slices. Do not close the fermentation jar too tightly so that the excess carbon dioxide can escape. There are also special glasses available with a suitable fermenting closure where the carbonic acid can escape automatically!
Leave this drink to stand at room temperature for 2-3 days and deaerate it briefly once a day. Then strain into a jug for drinking. Carefully rinse the kefir grains under cold water ready for their next use.

Make sure that all accessories are made of plastic, glass or wood because kefir does not tolerate metallic surfaces and can spoil if it comes into contact with metal.
Stored in the refrigerator, the water kefir will keep for at least four weeks.
Milk kefir is made in a similar way to water kefir. Kefir is a millennia-old milk product that is created through fermentation with the help of so-called kefir cultures. The viscous milk drink originally comes from the North Caucasus region, but is also widespread in other cultures. It is valued as digestive stimulant, refreshing, tasty and easily digestible.
Kefir tastes slightly sour, is carbonated, and slightly alcoholic. Kefir cultures, i.e. cultures of yeasts, lactic acid and acetic acid bacteria, are needed for its production. These health-promoting bacteria feed on the lactose and other components in the milk.
| 1 liter |
boiled fresh milk |
| 4 tbsp |
kefir grains (available in health food shops or online via www.fairment.de) |
A clean fermentation jar, e.g. a preserving jar, plastic sieve, plastic spoon
Heat the milk to 75-80 degrees Celsius (in a bain-marie) and let it stand until it reaches room temperature. Then pour into a clean, sealable container, either a preserving jar or a jar with a screw-top lid. Add the kefir grains to the jar with a plastic spoon. Close the jar and leave it for 1-2 days at room temperature, protected from light. Then pour through a plastic sieve into a jug and pour into a glass. Kefir will keep for a few days if refrigerated.
Carefully rinse the kefir grains under cold water for use for the next kefir batch, or store them covered with water in the fridge for a shorter period of time, or possibly freeze them for a longer period of time.
Kefir will keep for a few days if refrigerated.
With organic whole milk, with lactose-free whole milk or with some additional cream (approx. 20%) for a Greek cream yoghurt. The higher the fat content in the milk, the creamier the yoghurt. Low-fat milk makes a thinner yoghurt.
Both classic cow's milk and the fattier sheep's milk or goat's milk can be used to make yoghurt. To make vegan yoghurt, soy or coconut milk are best. When using almond, rice or oat milk, a thickener in powder form is needed.
One such thickener would be inulin. This is a completely natural prebiotic dietary fibre from chicory, Jerusalem artichoke or parsnips. It is a carbohydrate in which plants store energy. When Jerusalem artichokes are eaten, the inulin passes undigested through the stomach and small intestine, and it is only in the large intestine that the intestinal bacteria can use the fructose in the inulin.
Inulin primarily binds water and swells in the process. It imparts a creamy to creamy taste to yoghurt. Even low-fat yoghurt becomes naturally firmer and tastes wonderfully full-bodied.
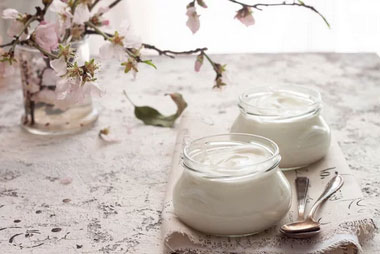
Making your own yoghurt with your choice of animal or vegetable fermented milk is really quite simple. All you need is a natural yoghurt that is as fresh and sturdy as possible as a starter, which means that it still contains as many natural bacteria as possible. From time to time, however, you may need a new starter yoghurt. You can also use a starter culture (2 tablespoons of yoghurt powder) from a health food shop.
Another thing worth mentioning for yoghurt lovers: are good, inexpensive yoghurt makers on the market which everything, including keeping the temperature constant. To start with however, you can also use an oven.
| 1 liter |
organic whole milk, possibly lactose-free or vegetable milk |
| 150 g |
solid natural yoghurt, animal or vegetable |
| 10 g |
inulin powder (optional) |
Vanilla yoghurt
The seeds from a vanilla pod or 2 tsp natural vanilla extract
Add approx. 60 g icing sugar, honey, maple or agave syrup or any other sweetener of your choice
Greek yoghurt
Add 200 g cream (36% fat) to the mixture
Fruit yoghurt
Add freshly mixed berries, fruit sauce or diluted jam.
Heat the organic raw milk to 70-80°C for a few minutes (in a bain-marie) and cool to 45°C. Add or stir in the starter yoghurt afterwards.
To make natural yoghurt, put the milk, starter yoghurt and inulin (if using) into a pot. For the other variations, add the additional ingredients. For vanilla yoghurt add the vanilla, for fruit yoghurt add honey and fruit pulp or for Greek yoghurt add the cream. Heat the combined ingredients for a few minutes to about 45°C.
Then pour everything into the neatly prepared jars and close each with a screw cap. For the fruit yoghurt, spread some fruit sauce or similar on the bottom of the jars beforehand.
Now it is important to keep the yoghurt warm at a constant 45°C for about 10 hours. Either in the oven, steamer or in a fermentation box. If necessary, switch off the oven briefly in between and leave the yogurt in the closed oven overnight.
Care must be taken not to shake or more the jars during this time so that the bacteria are not destroyed.
| 250 ml |
water |
| 150 g |
cashew kernels |
| 1-2 |
cloves of garlic |
| 1 tbsp |
lime juice |
| 2 tsp |
psyllium husks |
| 1 tbsp |
yeast flakes (brewer's yeast) |
Fine sea salt
Soak the cashews in water for about 4-5 hours, then puree with all the ingredients mentioned except the chives in a blender.
Fill the mixture into small molds lined with cling film, refrigerate for 3-4 hours, turn out of the mold, remove the cling film and roll in chives. The cheese is ready! Keeps well refrigerated for a few days!
| 1 liter |
tap water |
| 150 ml |
ready-made Kombucha drink as starter liquid |
| 1 |
Kombucha scoby (available in health food shops or online via www.fairment.de) |
| 100 g |
brown sugar |
| 6-8 g |
organic green or black loose tea |
A large, wide container for fermenting
Bring the water to the boil, add the tea (e.g. black and green tea in equal parts) and let it steep for about 10-15 minutes. Dissolve the sugar completely in the tea.
Wait for the tea cool down to room temperature and pour it into a glass fermentation jar. It is best to use glass jars that are not too small and wide, such as carafes, which give the newly growing scoby as large a surface area as possible to develop.
Now add the purchased Kombucha scoby together with the finished Kombucha drink (at least 150 ml per litre) to the fermentation glass.
Close the fermentation glass with an kitchen towel and a rubber ring so that the scoby can breathe but is still protected against pests. Leave the glass jar in a warm place at room temperature and do not move it for the next few days, if possible, so that the bacteria and yeasts can work undisturbed. After 3-4 days you should taste whether the drink has already become sour enough for you, otherwise leave it to mature for another 5-7 days or just more in the fridge. The longer you wait, the more sugar is broken down and the sourer the kombucha tea tastes. Once it suits your taste, strain the kombucha tea through a sieve and fill it into bottles with a funnel. Then put it back in the fridge.
When sealed, the kombucha usually forms even more carbonic acid and becomes particularly tasty and sparkling in flavor. However, make sure that excess carbonic acid can also escape, otherwise airtight bottles could also burst!
Immediately afterwards, you can start a new culture with a new batch of kombucha tea. To do this, however, the glass must be washed out while still very hot. During fermentation, some alcohol is produced, so that the finished Kombucha contains between 0.5 and 2 percent alcohol, which means it is not suitable for children.
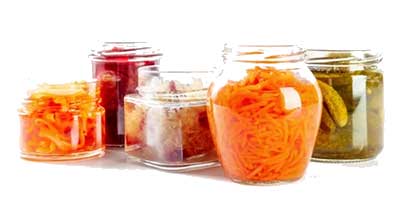
FERMENTED VEGETABLES
Try your hand at fermenting different vegetables: you will need a larger or several small glass jars with screw lids. During the fermentation process at room temperature, the lid on normal glass jars with screw tops or on preserving jars with rubber rings and wire lids should always be on loosely during fermentation so that the gases can escape. After the end of the fermentation process, the jar can then be closed with the lid if the jar is then placed in a cool room or refrigerator. There are special fermenting jars in different sizes with fermenting lids and glass weights to weigh down the contents available in shops or on the internet, these can be sealed straight away because the gases can escape through the fermenting outlet.
Fennel with carrots and ginger
| 2 |
fresh fennel bulbs |
| 4 |
medium carrots |
| 1 |
spring onion (scallion) |
| 1 tsp |
fresh ginger |
| 2 tsp |
sea salt |
Clean the vegetables, wash but do not peel. Halve the fennel, remove the stalk, cut into quarters and slice with the greens. Also cut the carrots into convenient slices, halve the larger ones first. Cut the spring onion into thicker slices. Cut the ginger into thin slices.
Mix everything together in a bowl with the salt, pressing well so that some juice runs out. Pour into the jars in layers with a masher and compact well. If there is still liquid missing, add some water until everything is well covered. Weigh down with the weight of the jar, put a lid (loose) or a lid with a fermentation cap (tight) on top and let it stand at room temperature for about 1-2 weeks. Once it suits your taste, remove the weight, seal the jar and store in the fridge for stock. Keeps for several weeks.
Red cabbage with apple and turmeric
| 1 |
small red cabbage |
| 2 |
sour/sharp apples |
| 1 |
small celery |
| 1 tsp |
brown sugar |
| 1 tsp |
turmeric |
| 2 tsp |
fine sea salt |
The process is always the same. The vegetables are cleaned and cut in the way that suits you. Either layer them tightly into the jar in elongated pieces from the bottom to the top, or crosswise for larger jars. The pieces should always be bite-sized and there should be little space in between for air pockets. Always fill up with water where the salt has already been dissolved (brine). It is important to fill in the vegetables in layers and to press them well. You can also puree some of the vegetables with the brine in a blender. Then the vegetables are first mixed well with it and only then put in. The rest of the process is the same as above. Just be creative and it will be fun!
| 1 kg |
Chinese cabbage |
| 1 |
white radish approx.300g |
| 2 |
carrots |
| 1 |
sour apple |
| 4 |
garlic cloves |
| 2 |
thumb-sized pieces of ginger |
| 2 |
spring onions |
| 2 tbsp |
red chilli flakes of the best quality |
| 4 tbsp |
fish sauce (made from anchovies and salt) |
| 2 tbsp |
soy sauce |
| 1 tbsp |
brown sugar |
Fine sea salt approx. 2% of the total weight of vegetables
Variation 1: To keep the leaves together, cut the stalk twice and pull the Chinese cabbage apart so that you have 4 parts in front of you. Wash these parts, put them in a large bowl and salt them well. Leave them to soften for about 2 hours.
Variation 2: Cut the Chinese cabbage into larger pieces and knead them in a large bowl with the salt (2g salt per kg of vegetables) until the liquid comes out and finally mix or mash (with gloves) the paste roughly pureed in the blender before pouring everything well mashed into the sterilized containers, adding a little water if necessary!
In the meantime, prepare the kimchi paste in a bowl. If making variation 1, cut everything into small pieces and mix well. If making variation 2, coarsely puree everything for the paste in a blender or cutter. To do this, wash the spring onion, clean, halve lengthwise and cut into 3-4 cm pieces. Peel the radish, first cut into slices, then into fine sticks. Cut the carrots and apple into very fine sticks as well. Peel and finely chop the garlic and ginger. Mix everything thoroughly with chilli flakes, sugar, soy sauce and fish sauce. It is best to put on gloves and press everything through as well as possible and mix together as well as possible.
Next, if making variation 1 fill all the soaked leaves in between individually with the finely chopped red kimchi paste and for variation 2, mix the coarsely mixed paste with the pieces of Chinese cabbage.
Pour the kimchi into a suitable large earthenware jar, porcelain jar, glass jar with a lid or several small jars with swing tops, pressing lightly with a tamper and making sure that all the vegetables are well covered with liquid, otherwise they may rot. Top up with brine as needed.
Make sure that the vegetables are pressed firmly enough into the jar and remain under the liquid brine. There should still be 3-5 cm of space towards the top. If the vegetables still float to the top, weigh them down slightly with a special jar weight or similar.
Now put the lid on loosely and do not screw it on tightly so that the gases can escape, otherwise the jar can also burst. There are also special fermentation jars that you can screw on tightly because they have a plastic lid with an integrated fermentation seal. This allows the carbonic acid to escape and prevents oxygen from getting in.
Store at room temperature for 2-5 days, but it can also be eaten after the third day. Afterwards, it is best to keep the kimchi well sealed in the refrigerator to slow down the fermentation process and check it from time to time.
Kimchi is edible at any stage, according to personal taste, and will keep for several weeks in the refrigerator. The longer it is left, the sourer it becomes. Extra virgin olive oil, linseed oil and roasted pine or sesame seeds can be added to kimchi as a starter.
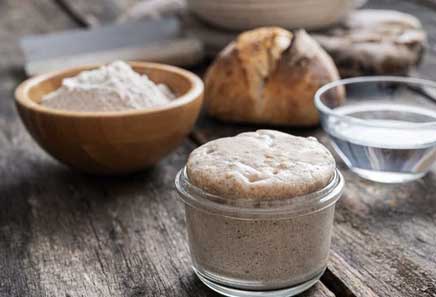
HOMEMADE SOURDOUGH
Sourdough is a natural leavening agent and contains natural yeasts and lactic acid bacteria that keep it in a constant state of fermentation. The souring is caused by lactic acid fermentation of the bacterial cultures involved, which occur naturally in the air. Working with sourdough requires patience. You need some time and leisure to observe the fermentation and wait for the success. This is not for everyone in our hectic times, but it can be a kind of therapy. It's like a garden, it only grows and thrives if you constantly take care of it. If you don't have the patience, it's better not to do it, but if you do, you will experience unforgettable taste sensations and a relationship with your own product and bread. In any case, the most important thing with sourdough is to have a constant temperature, which is around 28°C, so that the micro-organisms can multiply well.
Lactic acid bacteria from the air gets into the sourdough, multiplies there and starts to ferment. This is also called spontaneous fermentation. However, sourdough can taste very different depending on which flour is used and how it is managed. Either it is very mild at a warm temperature of about 30° C or it is rather strong at 24-28° C. In this case, the taste can be completely different. The art is to keep the sourdough at a constant temperature. At cooler temperatures, more acetic acid bacteria are produced in the sourdough, at warmer temperatures more lactic acid bacteria. If you want to be on the safe side, you can buy an incubator (fermenter). For the more experienced, a carefully tempered oven will also do.Lactic acid bacteria from the air gets into the sourdough, multiplies there and starts to ferment. This is also called spontaneous fermentation. However, sourdough can taste very different depending on which flour is used and how it is managed. Either it is very mild at a warm temperature of about 30° C or it is rather strong at 24-28° C. In this case, the taste can be completely different. The art is to keep the sourdough at a constant temperature. At cooler temperatures, more acetic acid bacteria are produced in the sourdough, at warmer temperatures more lactic acid bacteria. If you want to be on the safe side, you can buy an incubator (fermenter). For the more experienced, a carefully tempered oven will also do.
What you need for the sourdough:
100g organic rye, buckwheat or spelt flour. Best freshly ground in the grain mill shortly beforehand, otherwise just use wholemeal flour. 2 smaller bowls, a scale, a thermometer, an incubator and patience. For completely gluten-free bread, prepare the sourdough with buckwheat flour or use yeast. For flours with gluten, the sourdough can break down most of the gluten protein and make it more digestible.
1st stage ADJUSTMENT DYE:
Mix 100g of freshly ground flour in a bowl with 100-200ml of warm water and leave it covered with a clean cloth at 28°C for 24 hours. Some prefer it more liquid, others more solid. Mix well once every 12 hours.
2nd STAGE OF MIXING:
Mix 100g of freshly ground flour with100 ml of warm water and add to the starter dough. Leave open again at 28°C for 24 hours.
Stage 3 FEEDING:
Again mix 100g of freshly ground flour with 100ml of warm water and add to the batch. Now change the temperature to 33°C and leave covered with a cloth for 8 hours.
STAGE 4:
Add another 100g of freshly ground flour mixed with 100ml of warm water, mix and leave open at 28°C for 16 hours.
SOURDOUGH IS READY FOR USE:
Now you have produced 900g of sourdough yourself, which can be used immediately for baking bread. You can also store the spontaneous sourdough with a loose lid in the fridge for one to two weeks, this way it will not ferment as quickly. If you bake bread regularly, always leave about 1/3 of the spontaneous sourdough and feed it with some flour and water (at 25-28°C for 18 hours). This way you always have enough sourdough for bread baking. Or if you have mixed 2/3 of the spontaneous sourdough to the whole bread dough, take a part of the bread dough and feed the rest of the spontaneous sourdough with it. If you mix the whole spontaneous sourdough with it and put some of it aside, the sourdough will lack strength for further fermentation.
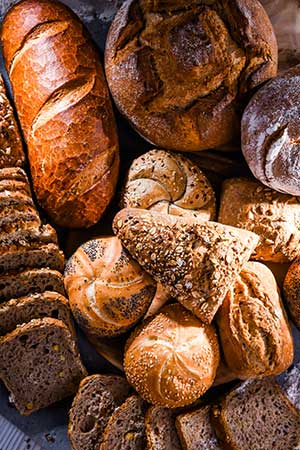
Sourdough bread has an incomparable taste and great dough properties. The bacterial life is in a symbiosis and provides for cleavage processes that can play a major role in intolerances. For many people with gluten intolerance, rye sourdough bread can be well tolerated.
Of course, you can also use a fully ripened dry sourdough made from natural wild yeasts and sourdough cultures, which is already available in well-stocked health food shops. You can then also continue to feed this. The older the cultures, the better! If the sourdough ferments too quickly and bubbles after only 2 days, you can shorten the process and shorten the feeding interval. If you feed twice day, then you will get be through with the stages faster. As soon as the sourdough is active, shows lots of bubbles and has doubled in volume, you can use it for baking. In the short term, the fermentation process of a sourdough or bread dough can be stopped in the refrigerator, but then needs twice the time to come back to a usable temperature. This also applies to fermented dishes.
Dough and flour types
Local organic wholegrain flours are ideal. This should be finely ground in your own small grain mill with natural grinding stones shortly before use, so that it is already tempered - i.e. warm. The bran in the grain is the food for the bacteria in the sourdough. If you cannot grind your own flour, then always buy organic wholemeal flours for wheat, spelt, buckwheat, rye, etc. and use them quickly.
Basically, you can acidify all flours, even those that are not made of bread grain that is suitable for baking or are naturally gluten-free. You just have to mix and experiment a little. Wheat, spelt and rye are the most common types, however, and sourdough is especially recommended with rye to ensure that the bread turns out well.
Rye sourdough is often used because it has a strong taste and is aromatic and sour. Wheat sourdough is often much milder and is used for light breads with a loose, open crumb. Spelt sourdough (the original form of wheat) is often used for wholemeal spelt breads. Each flour has its own taste and of course the untreated cultivation and the milling grade are particularly important.
As mentioned above, it is preferable to use wholemeal flour for the starter dough, because it is easy to acidify due to the ground husks (food for the bacteria). The type of grain is relatively unimportant. Mixing is also allowed with sourdough, you can also make a wheat, buckwheat or spelt sourdough from a rye starter.
Sourdough also breaks down phytic acid, making it easier for the body to absorb nutrients and minerals. In addition, it makes the gluten in bread more digestible for many people. Incidentally, before yeast was industrially produced, many bakers used these wild yeasts as leavening agents for bread and other baked goods. Often it was kept carefully for decades. On farms rye bread was typically baked once a month, and the sourdough starter was carefully kept in a wooden vat for years.
600g buckwheat flour for completely gluten-free bread or rolls, or 600g spelt flour, or half buckwheat and half spelt flour, or half spelt and half rye flour freshly ground, or other flour mixtures. In these cases, ferment or left rise overnight with sourdough to break down gluten to a large extent.
approx. 400ml lukewarm water (keep the dough loose that it just keeps its shape - if necessary, firm it up with some flour, never the other way round)
150-200g sourdough (let bread dough rise overnight, if gluten can be consumed, let it rise with yeast 2 x 1h)
Sea salt
Knead the chosen, freshly milled flour with all ingredients in the mixing bowl with the mixer and a dough hook to a very loose bread dough and possibly take 150 -200g away from the bread dough again for further feeding of the sourdough. (Use this bread dough for the starter sourdough as described above, feed it or keep the fermentation process in the refrigerator if no bread is baked for 1-2 weeks).
Transfer the remaining bread dough from the mixer to a wooden board, work it well again with your hands and a add little flour, transfer it to a bowl and let it rise overnight covered with a cloth in a warm place. Then knead it again briefly with your hands until it is loose and then put it into a floured proving basket. Cover with a cloth and leave in a warm place for about 1 hour or more. When the dough has reached a nice volume, turn the bread dough out of the basket onto a floured baking tray and bake at about 200-220°C (depending on the oven) for about 50 minutes. (If necessary, place a small bowl of boiling water on the bottom of the oven to create some steam). The bread is ready, now let it steam on a rack.
If you use 1 packet of dry yeast instead of sourdough, the rising time is reduced to 2 times 1 hour.
Now you have the choice as to what other ingredients you would like to add to the bread dough. You can add walnuts, pine nuts, pumpkin seeds, sunflower seeds, possibly 2-3 tablespoons of vegetable oil, sliced olives, fresh herbs, caraway seeds, onion roasted in oil, garlic, etc.
Generally, the basic recipe always remains pretty much the same. Variations in terms of more liquid intake naturally occur due to longer storage and drying out of the grains, where moisture is also lost. As a result, you need a little more liquid for a fluffy bread dough. To be on the safe side, always use 10-20% more liquid than stated in the recipe, because this can be easily corrected with a little flour, however if the dough is too firm it becomes greasy and does not rise as expected. The dough should therefore always be very loose. So loose and smooth that it just keeps the desired shape. To support particularly soft and loose dough, there are also loaf tins for baking.
You can also form smaller rolls of approx. 40-60g from this dough, then let them "rise" for approx. 20-30 minutes and bake them at approx. 200-220°C (depending on the oven) for about 15-17 minutes until golden brown and let them steam out on the rack. Afterwards, freeze some while they are still warm!
Homemade sauerkraut juice

You can also buy sauerkraut juice in shops, but it is usually no longer active. This is down to the pasteurization (heating) of the juice to ensure that it lasts longer. Unfortunately, this process kills many of the healthy, heat-sensitive ingredients. The juice can then no longer produce the desired health effects in the body.
SeHowever, sauerkraut juice still contains the all-important living bacteria and many good nutrients that are simply necessary for healthy intestinal flora. These include B vitamins, including B12, vitamins A, C, E and K, as well as many different lactic acid bacteria. Fermenting the white cabbage allows the lactic acid bacteria to proliferate. These good bacteria support the slightly acidic environment in the intestine, they feel extremely comfortable in it. The colonization of undesirable bacteria is made much more difficult in the acidic environment.
| 1 kg |
white cabbage |
| 3 l |
water |
| ½ tsp |
fine sea salt |
Clean the cabbage, cut in half, remove the stalk and cut or slice the cabbage into fine strips.
Add salt and knead until the juice comes out, then mash well and put in a suitable container made of wood, glass, ceramic or clay (it should not be completely full).
Fill with tap water and cover loosely to allow the gases to escape during fermentation, or use a fermentation stopper.
Leave the mixture at room temperature for 5-6 days to ferment. Then store in the refrigerator and strain only as much as is being drunk at any one time.
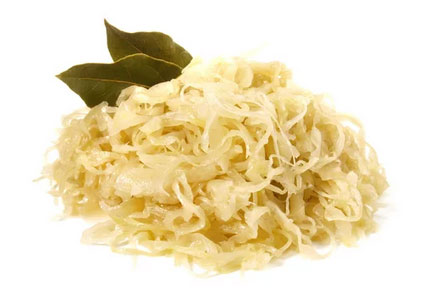
Sauerkraut through natural lactic acid fermentation
Since sauerkraut is more demanding in terms of digestion, it comes at the end of all fermented dishes, but it remains the supreme discipline. It is important to pay attention to the right amount of raw sauerkraut for you, to the time of day, to the combination with other foods and especially to your individual tolerance in order to find the recipe that suits you best. Sauerkraut is a remedy in itself. Some time after the Mayr cure, it is probably the crowning glory for our microbiome.
Sauerkraut is made from white cabbage through the lactic fermentation of fresh white cabbage. Lactic acid fermentation is a great process of fermenting in which sugars in the cabbage - i.e. the carbohydrate content - are converted into lactic acid by natural, harmless bacteria. This not only gives the cabbage its characteristic mildly acidic flavor, but also preserves it.
| 2 |
organic winter cabbages (firm cabbage) |
| 3 tbsp |
brown sugar |
| 2 tbsp |
fine sea salt |
Caraway seeds to taste
If necessary, remove the outer leaves from the firm cabbage heads. Then cut the heads in half and remove the stalk from each. Now slice each piece of cabbage very finely into a bowl in long strands with a cabbage slicer, or if necessary cut with a bread slicer.
Layer the cabbage in a tall, wide pot. First cover the bottom with 2 whole cabbage leaves, sprinkle in the sugar and briefly coat the first layer of cabbage with a little salt, then press it down well until the liquid comes out and covers the cabbage. Repeat this process in layers until the pot is 2/3 full. Sprinkle the spices in between, if desired.
Again, mash the cabbage well with a wooden masher until the juice is higher than the cabbage. Then cover the pot with whole cabbage leaves. If necessary, cover with a kitchen towel and place a suitable wooden board or lid in the pot over the cabbage. Weigh down the wooden board with 2 weights or a bucket of water or other things. Or work with smaller or larger fermentation jars that already have a plastic lid with a fermentation cap.
The sauerkraut should be checked on 2-3 times a week. Skim off the cloudy foam layer from open jars, clean the cloth and wooden board every week and also the inner rim of the pot or replace the cloth. If there is not enough liquid after cleaning, the mixture can also be doused with a little salt water.
After 3-4 weeks, the homemade sauerkraut will start to taste really good and is ready to eat raw. Now it can be stored in normal jars and refrigerated. Eat it raw if possible, as it is already pre-digested. As a side dish, do not cook it, but only heat it to about 45 degrees so as not to kill the bacterial life.
Sauerkraut salad with apple and carrots
| 200 g |
fermented sauerkraut |
| 2 |
medium carrots |
| 2 |
sour/sharp apples |
| 4 |
peach halves (jar) |
| 1 tbsp |
honey |
| 2 tbsp |
extra virgin olive oil |
Sea salt
Roughly chop the sauerkraut and place in a bowl. Wash the apples, peel them if necessary, core them and chop them. Clean, wash and roughly grate the carrots. Cut the peaches into small cubes. Add everything to the bowl, mix with the cabbage, season well with honey, olive oil, salt and pepper and serve.